
Interactive tables with browsing and sorting can be a wonderful way of checking out data. And sometimes, you may well want to share that data with other people — like textual content-only data like a checklist of Do Extra With R movie tutorials.
But when that data includes a column with quite long entries, that column could not in shape properly in a desk the width of your display screen. This can be specifically difficult when not just about every row includes the really-broad column. For example, a desk of questionnaire effects the place a person industry is “Do you have any more reviews?” Not every person could.
Which is the place a desk with expandable rows can appear in handy. At the NICAR data journalism convention previously this calendar year, I posted a sort so speakers (and other attendees) could submit one-way links to session shows. Some people included more reviews other individuals did not. Demonstrating that column by default would waste a large amount of display screen serious estate.
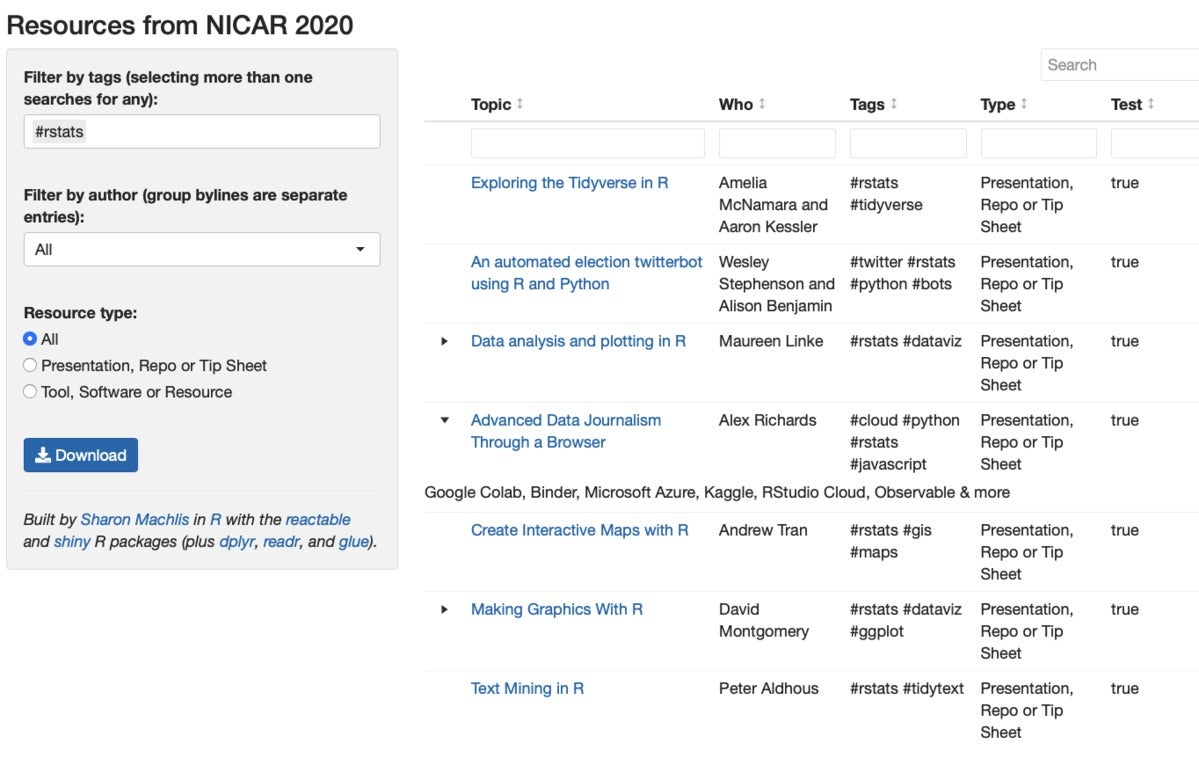
As a substitute, that comment industry displays in my interactive desk of NICAR resources only if a person clicks on the grow-row icon. Not just about every row can be expanded with a clickable icon at the left of the Matter title for the reason that not just about every row has data in that industry, as you can (ideally) see in the screenshot beneath.
 Sharon Machlis, IDG
R-generated desk with some rows that are expandable to show much more information and facts.
Let us see how to make a desk like this.
If you’d like to observe alongside, install and load the reactable package. For this demo, you are going to also have to have the rio, glue, htmltools, and dplyr packages mounted.
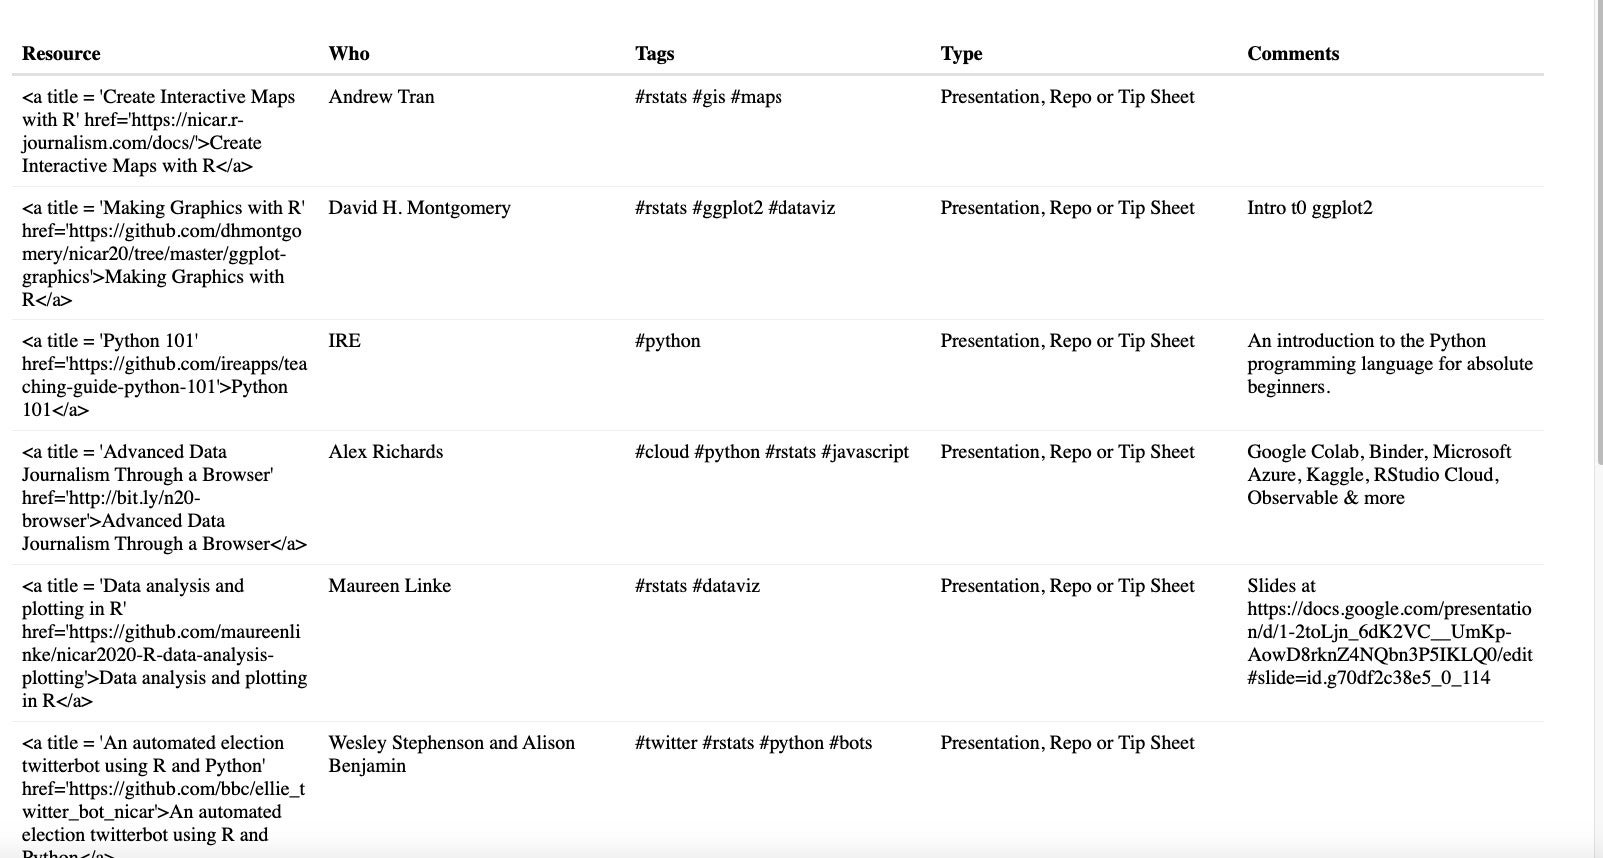
You can obtain the data I’ll use in this demo from the connection beneath. It’s a smaller (15 rows) data established about R and Python sessions at this year’s NICAR convention.
15 rows of information and facts about R and Python sessions at the 2020 NICAR data journalism convention Sharon Machlis
Load reactable and dplyr in R
In the code beneath, I load reactable and dplyr and then import my data utilizing rio::import().
library(reactable)
library(dplyr)
nicar <- rio::import("nicar.csv")
The data has columns for the title of the resource (What), the author (Who), TheURL, Tags, Form, and Reviews.
Subsequent, I want create a new column termed Useful resource with a clickable connection to every resource. I am just writing a tiny simple HTML utilizing the What and TheURL columns to make it less difficult for buyers to get to assets displayed in the desk.
Then I pick out the columns I want in the get I want them.
nicar <- nicar %>%
mutate(
Useful resource = glue::glue("What")
) %>%
pick out(Useful resource, Who, Tags, Form, Reviews)
Start out with a simple reactable table
Ultimately, I create a simple, default reactable desk.
reactable(nicar)
And this desk is simple. There is no search box nonetheless and the Useful resource column shows the true HTML code alternatively of displaying as HTML.
 Sharon Machlis, IDG
Default reactable desk with no search box and column displaying HTML code alternatively of HTML as HTML.
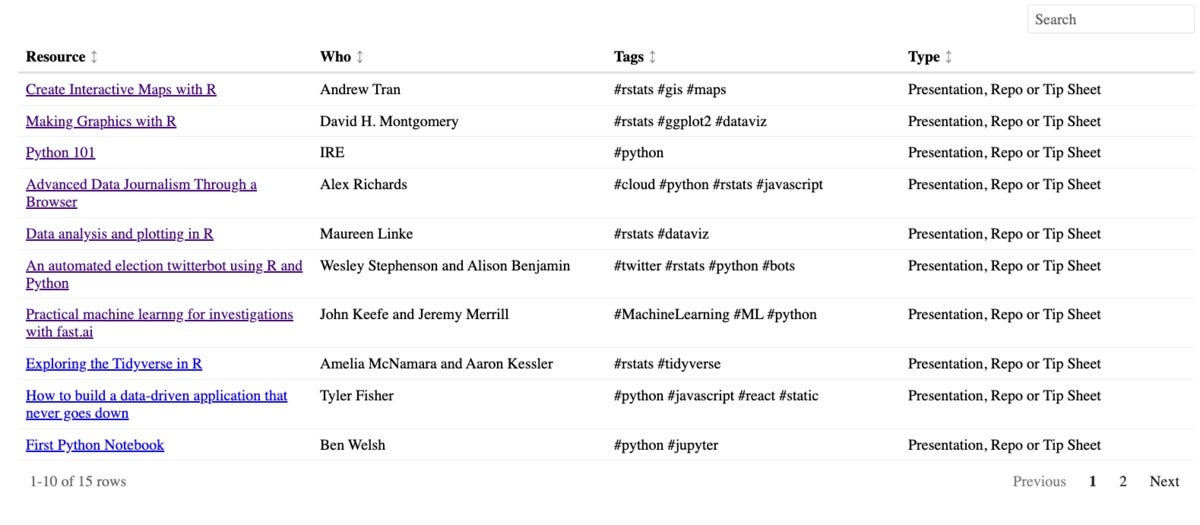
In the upcoming code team, I increase a search box to the desk and tiny arrow icons exhibiting that the columns are sortable.
reactable(nicar, searchable = Correct, showSortable = Correct, showSortIcon = Correct)
To notify reactable to show the Useful resource column as HTML, I use the columns argument and a checklist the place colDef sets the attributes of a person or much more columns. Below, I’m setting html = correct for the Useful resource column so it displays as HTML, and I’m also building that column resizable.
reactable(nicar, searchable = Correct, showSortable = Correct, showSortIcon = Correct,
columns = checklist(
Useful resource = colDef(html = Correct, resizable = Correct)
)
)
To notify reactable not to show the Reviews column in the major desk, I established colDef(clearly show = Fake).
reactable(nicar, searchable = Correct, showSortable = Correct, showSortIcon = Correct,
columns = checklist(
Useful resource = colDef(html = Correct, resizable = Correct),
Reviews = colDef(clearly show = Fake)
)
)
So considerably so very good.
 Sharon Machlis, IDG
Reactable desk tweaked to consist of a search box, a person column displaying as HTML, and another column not exhibiting in the major desk.
Incorporate reactable code for expandable rows
The upcoming phase is adding the expandable rows, and that is a bit much more complicated:
# Function wanted according to Greg Lin, creator of reactable
html <- function(x, inline = FALSE)
container <- if (inline) htmltools::span else htmltools::div
container(dangerouslySetInnerHTML = checklist("__html" = x))

reactable(nicar, searchable = Correct, showSortable = Correct,
columns = checklist(
Useful resource = colDef(html = Correct, resizable = Correct),
Reviews = colDef(clearly show = Fake)
),
# if there exists a comment, make row expandable
aspects = function(index)
if(nicar$Reviews[index] != "")
htmltools::tagList(
html(nicar$Reviews[index])
)


)
I did not compose this section myself reactable creator Greg Lin wrote it. Honestly, I really don't have an understanding of what just about every line is executing. But it is effective!
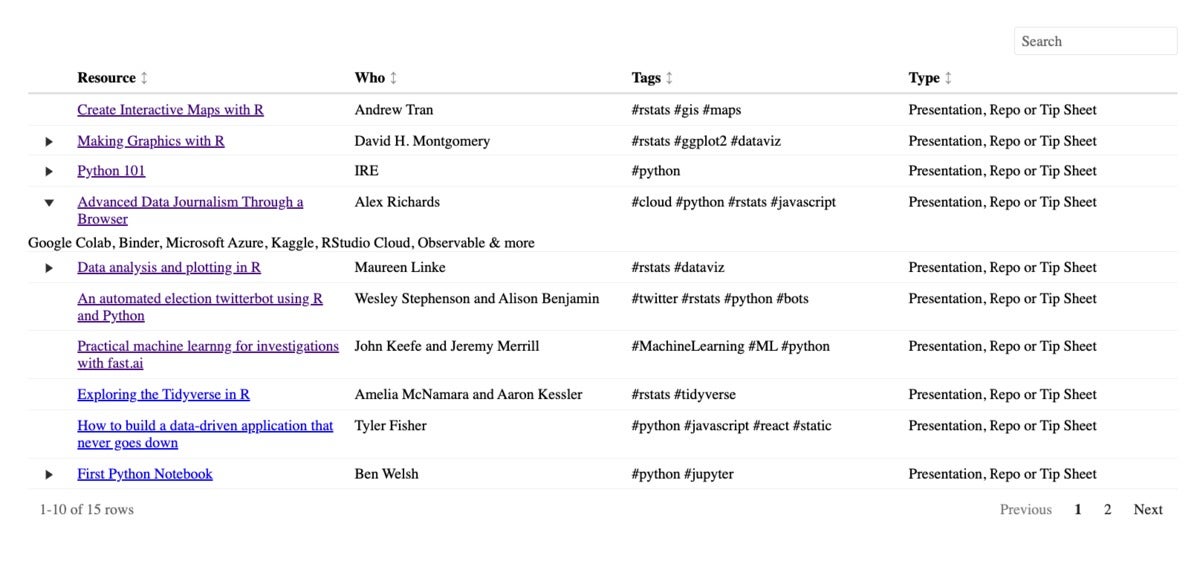 Sharon Machlis
A reactable desk with expandable rows.
Will I try to remember this code the upcoming time I want to make a desk with expandable rows? No. Undoubtedly not. But if I make an RStudio code snippet, I really don't have to try to remember it. It will always be just a couple of keystrokes away.
If you are not familiar with RStudio code snippets at all, check out out the Do Extra With R episode on code snippets for a complete explainer. But listed here are the fundamental principles.
Make an RStudio code snippet
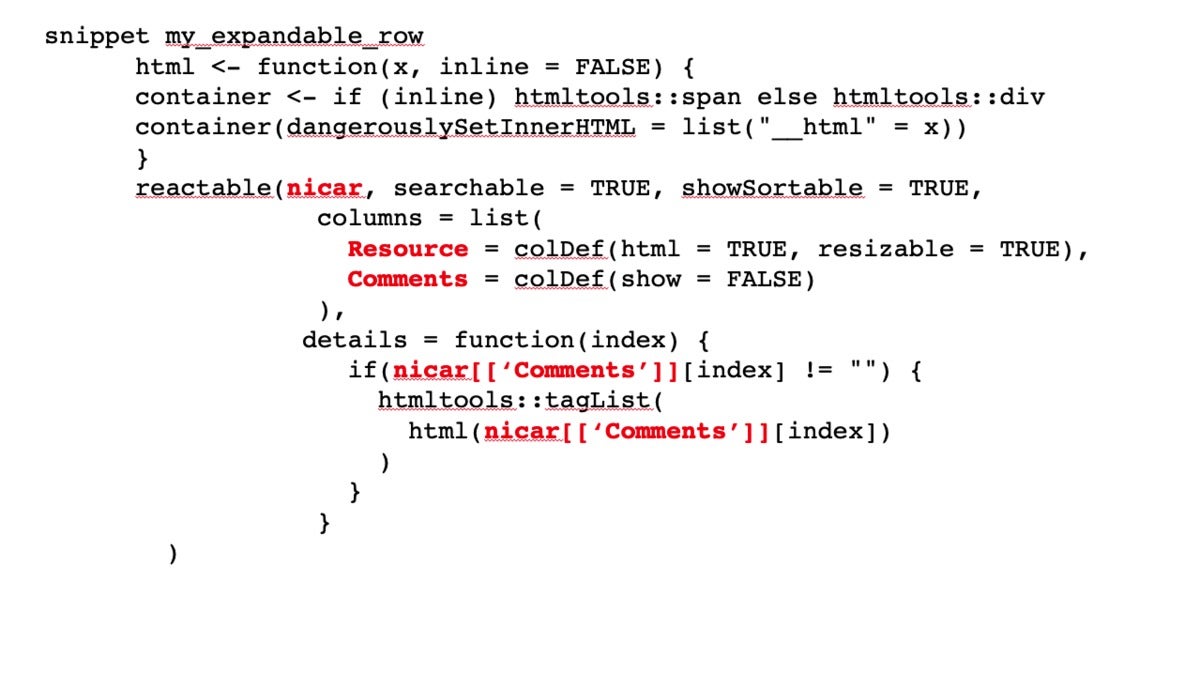
Below is an picture of my desk code highlighting the variables for my data frame and column names, as properly as switching the column definition from greenback signal notation to bracket notation (which is effective a large amount improved in snippets). Also — really significant — I included a snippet title and indented just about every line of code with a beginning tab. Which is a will have to!
 Sharon Machlis, IDG
Code for my desk with variables highlighted, column syntax changed to bracket notations, and snippet title and indentation included.
Then I just have to have to change every variable title to a generic snippet variable: 1 for the data frame, 2 for the column I want to show as HTML, and three for the expandable-row column. Note the variable syntax: $selection:variable_title. These variables will make it quick for me to fill in true variable names again in RStudio.
snippet my_expandable_row
html <- function(x, inline = FALSE)
container <- if (inline) htmltools::span else htmltools::div
container(dangerouslySetInnerHTML = checklist("__html" = x))

reactable($1:mydf, searchable = Correct, showSortable = Correct,
columns = checklist(
$2:html_column = colDef(html = Correct, resizable = Correct),
$three:grow_col = colDef(clearly show = Fake)
),
aspects = function(index)
if($1:mydf[['$three:grow_col']][index] != "")
htmltools::tagList(
html($1:mydf[['$three:grow_col']][index])
)


)
You can duplicate and paste the snippet code over into your individual RStudio snippets file utilizing
usethis::edit_rstudio_snippets()
to open up the snippets file in RStudio. Make certain the snippet code quotes are plain quotes and that every line is indented with a tab (not just areas a beginning tab for every line of code is obligatory).
Now if you form the title of the snippet in an RStudio source R script file, it really should grow to give you the code. You can then form the title of the initial variable, hit tab, form the title of your 2nd variable, and so on. Examine out the movie embedded in this post to see how this is effective. And get pleasure from your individual interactive tables with expandable rows!
For much more R guidelines, head to the InfoWorld Do Extra With R website page.
Copyright © 2020 IDG Communications, Inc.
